In this guide, we are going to learn how to install and configure OpenLDAP server on Debian 9 Stretch. OpenLDAP is an opensource implementation of Lightweight Directory Access Protocol, a non-relational database for accessing data. It commonly serves as an authentication backend for various services or an address book e.g for email clients.
Install and configure OpenLDAP Server on Debian 9 Stretch
Update and upgrade your system packages
apt update
apt upgrade
Install LDAP packages
apt -y install slapd ldap-utils
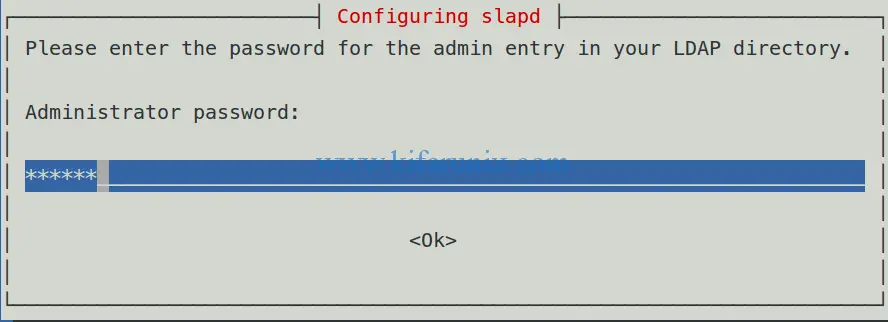
The installer will prompt you to set the LDAP administrator password.
Select Ok and press enter to re-enter the password for verification.
Press Enter to proceed with installation and configuration.
If you noticed, the installer doesn’t prompt for DNS domain nor the organization name. These are set based on the server’s hostname (domain name e.g example.com).
When the installation completes, you can use slapcat command to dump the contents of SLAPD configuration database.
slapcat
dn: dc=example,dc=com
objectClass: top
objectClass: dcObject
objectClass: organization
o: example.com
dc: example
structuralObjectClass: organization
entryUUID: 500707ac-a37d-1038-847d-09fcfa8020a8
creatorsName: cn=admin,dc=example,dc=com
createTimestamp: 20190103082837Z
entryCSN: 20190103082837.967303Z#000000#000#000000
modifiersName: cn=admin,dc=example,dc=com
modifyTimestamp: 20190103082837Z

dn: cn=admin,dc=example,dc=com
objectClass: simpleSecurityObject
objectClass: organizationalRole
cn: admin
description: LDAP administrator
userPassword:: e1NTSEF9VDZmUXY5WWRXb1RMbHczd2NrTS9zSTdob2xHNUZscDE=
structuralObjectClass: organizationalRole
entryUUID: 500a9502-a37d-1038-847e-09fcfa8020a8
creatorsName: cn=admin,dc=example,dc=com
createTimestamp: 20190103082837Z
entryCSN: 20190103082837.990678Z#000000#000#000000
modifiersName: cn=admin,dc=example,dc=com
modifyTimestamp: 20190103082837Z
From the above slapd database configuration, the installer sets the Base DN to dn: dc=example,dc=com, the organization name to o: example.com and Base DN for admin to dn: cn=admin,dc=example,dc=com.
You can check the Base DN set by using the ldapsearch command as shown below;
ldapsearch -x -LLL -b dc=example,dc=com dn
dn: dc=example,dc=com

dn: cn=admin,dc=example,dc=com
Allow LDAP port on UFW (if it is running) to allow external clients to connect:
ufw allow ldap
Rule added
Rule added (v6)
Reload UFW
ufw reload
Firewall reloaded
Test LDAP connection with ldapwhoami command;
ldapwhoami -H ldap:// -x
anonymous
The anonymous user is because we run the test without logging in to LDAP server. This means that LDAP is responding to queries.
Create a Base DN for Users and Groups
As shown above, the Base DN for the administrator has been created. However, since we are going to manage users using the LDAP server, you need to create a Base DN for users and groups. Therefore create an LDAP interchange format file with the following contents and use it to create the user/group Base DN. Be sure to replace the domain name accordingly.
vim user_group_base.ldif
dn: ou=people,dc=example,dc=com
objectClass: organizationalUnit
ou: people

dn: ou=groups,dc=example,dc=com
objectClass: organizationalUnit
ou: groups
To add this entry, run the command below. When prompted for LDAP password, enter the LDAP admin password set during installation.
ldapadd -x -D cn=admin,dc=example,dc=com -W -f user_group_base.ldif
Enter LDAP Password: LDAP admin password
adding new entry "ou=people,dc=example,dc=com"

adding new entry "ou=groups,dc=example,dc=com"
Add LDAP User Accounts
In order to add LDAP user accounts to LDAP Server, you need to create an LDIF file containing attributes definition for the users. To add user with a password, you need to generate the password using the slappasswd command.
slappasswd
New password: PassW0rd
Re-enter new password: PassW0rd
{SSHA}7C1UCXJvN3UnryzVttzHWzLD/B10ilq3
Create new user ldif file with the following content. Replace your domain, the user names and the value of {SHA} accordingly.
vim new_user.ldif
dn: uid=amibey,ou=people,dc=example,dc=com
objectClass: inetOrgPerson
objectClass: posixAccount
objectClass: shadowAccount
uid: amibey
cn: amibey
givenName: Amos
sn: Mibey
userPassword: {SSHA}7C1UCXJvN3UnryzVttzHWzLD/B10ilq3
loginShell: /bin/bash
uidNumber: 10000
gidNumber: 10000
homeDirectory: /home/amibey
shadowMax: 60
shadowMin: 1
shadowWarning: 7
shadowInactive: 7
shadowLastChange: 0

dn: cn=amibey,ou=groups,dc=example,dc=com
objectClass: posixGroup
cn: amibey
gidNumber: 0
memberUid: amibey
This will create a user whose username is amibey.
Run the command below to add the user above.
ldapadd -x -D cn=admin,dc=example,dc=com -W -f new_user.ldif
Enter LDAP Password: admin password
adding new entry "uid=amibey,ou=people,dc=example,dc=com"

adding new entry "cn=amibey,ou=groups,dc=example,dc=com"
You can list all the users under the base, dc=example,dc=com, using the command below;
ldapsearch -x -LLL -b "dc=example,dc=com"
To print all the LDAP user information, run the command below;
ldapsearch -x -LLL -b dc=example,dc=com '(objectclass=*)'
dn: dc=example,dc=com
objectClass: top
objectClass: dcObject
objectClass: organization
o: example.com
dc: example

dn: cn=admin,dc=example,dc=com
objectClass: simpleSecurityObject
objectClass: organizationalRole
cn: admin
description: LDAP administrator

dn: ou=people,dc=example,dc=com
objectClass: organizationalUnit
ou: people

dn: ou=groups,dc=example,dc=com
objectClass: organizationalUnit
ou: groups

dn: uid=amibey,ou=people,dc=example,dc=com
objectClass: inetOrgPerson
objectClass: posixAccount
objectClass: shadowAccount
uid: amibey
cn: amibey
givenName: Amos
sn: Mibey
loginShell: /bin/bash
uidNumber: 10000
gidNumber: 10000
homeDirectory: /home/amibey
shadowMax: 60
shadowMin: 1
shadowWarning: 7
shadowInactive: 7
shadowLastChange: 0

dn: cn=amibey,ou=groups,dc=example,dc=com
objectClass: posixGroup
cn: amibey
gidNumber: 10000
memberUid: amibey
You can as well delete an LDAP user/group with the commands below;
ldapdelete -x -W -D "cn=admin,dc=example,dc=com" "uid=amibey,ou=people,dc=example,dc=com"
ldapdelete -x -W -D "cn=admin,dc=example,dc=com" "cn=amibey,ou=groups,dc=example,dc=com"
In case you need to reset the user password, you can use ldappasswd command as shown below;
ldappasswd -H ldap://192.168.43.59 -x -D "cn=admin,dc=example,dc=com" -W -S "uid=amibey,ou=people,dc=example,dc=com"
New password: user pass
Re-enter new password: user pass
Enter LDAP Password: LDAP admin pass
To verify the user’s password, you can use ldapwhoami command as shown below;
ldapwhoami -vvv -h 192.168.43.59 -D "uid=amibey,ou=people,dc=example,dc=com" -x -W
ldap_initialize( ldap://192.168.43.59 )
Enter LDAP Password: user password
dn:uid=amibey,ou=people,dc=example,dc=com
Result: Success (0)
If you see Result: Success (0) then the password matches. If the credentials are wrong, you will get the following output.
ldapwhoami -vvv -h 192.168.43.59 -D "uid=amibey,ou=people,dc=example,dc=com" -x -W
ldap_initialize( ldap://192.168.43.59 )
Enter LDAP Password:
ldap_bind: Invalid credentials (49)
That is it all takes to simply install and configure OpenLDAP server on Debian 9 Stretch. In our next tutorial, we will learn how configure LDAP client on Debian 9 stretch.
Related Tutorials
Install and Setup FreeIPA Server on CentOS 8
Setup OpenLDAP Server with SSL/TLS on Debian 10
Configure SSSD for OpenLDAP Client Authentication on Debian 10/9


