In this tutorial, you will learn how to deploy Ceph storage cluster in Kubernetes using Rook. Rook is an open-source cloud-native storage orchestrator that provides a platform, framework and support for deploying various distributed storage solutions such as Ceph, NFS, Cassandra, Minio, CockroachDB etc on Kubernetes. This guide will focus on deploying Ceph, a distributed storage system that provides file, block and object storage services, using Rook.
We are using Ubuntu 22.04 LTS server in our cluster.
Table of Contents
Deploying Ceph Storage Cluster in Kubernetes using Rook
Why Rook for Ceph Deplyment on Kubernetes Cluster?
Some of the benefits of using Rook to deploy Ceph on Kubernetes cluster:
- Task automation: Rook automates deployment, bootstrapping, configuration, provisioning, scaling, upgrading, migration, disaster recovery, monitoring, and resource management for your Ceph storage cluster.
- Self-managing, self-scaling, self-healing: Rook ensures that the storage services are always available and performant. It automatically scales the storage up or down as needed and heals any issues that may arise.
- Seamless integration with Kubernetes: Rook uses the Kubernetes API and scheduling features to provide a seamless experience for managing your storage. You can use familiar Kubernetes commands and tools to interact with your Rook deployed storage cluster.
Rook Components
Rook is made up of several components that work together to manage a storage cluster:
- Rook Operator: This is the core component of Rook. It is a Kubernetes operator that is responsible for deploying, configuring, and managing your storage clusters.
- Rook agents: These are the daemons that run on each node in the Kubernetes cluster. They are responsible for mounting and unmounting storage devices and for managing the lifecycle of storage pods.
- Rook discover: rook-discover is a dedicated containerized component that runs as a pod within your Kubernetes cluster. It is responsible for actively scanning the cluster for existing Ceph daemons such as MONs, OSDs, and MGRs. Rook Discover informs the Rook Agent about the discovered OSDs.
Other components include but not limited to;
- Ceph daemons:
- MONs: Manage the Ceph cluster and store its configuration
- OSDs: Store data in the Ceph cluster
- MGRs: Provide management services for the Ceph cluster
- Custom Resource Definitions (CRDs):
- Define the desired state of the storage cluster
- Allow users to configure the storage cluster
- CSI drivers:
- Allow Rook to integrate with the Container Storage Interface (CSI).
- There are three CSI drivers integrated with Rook; Ceph RBD, CephFS and NFS (disabled by default). CephFS and RBD drivers are enabled automatically by the Rook operator.
The Architecture
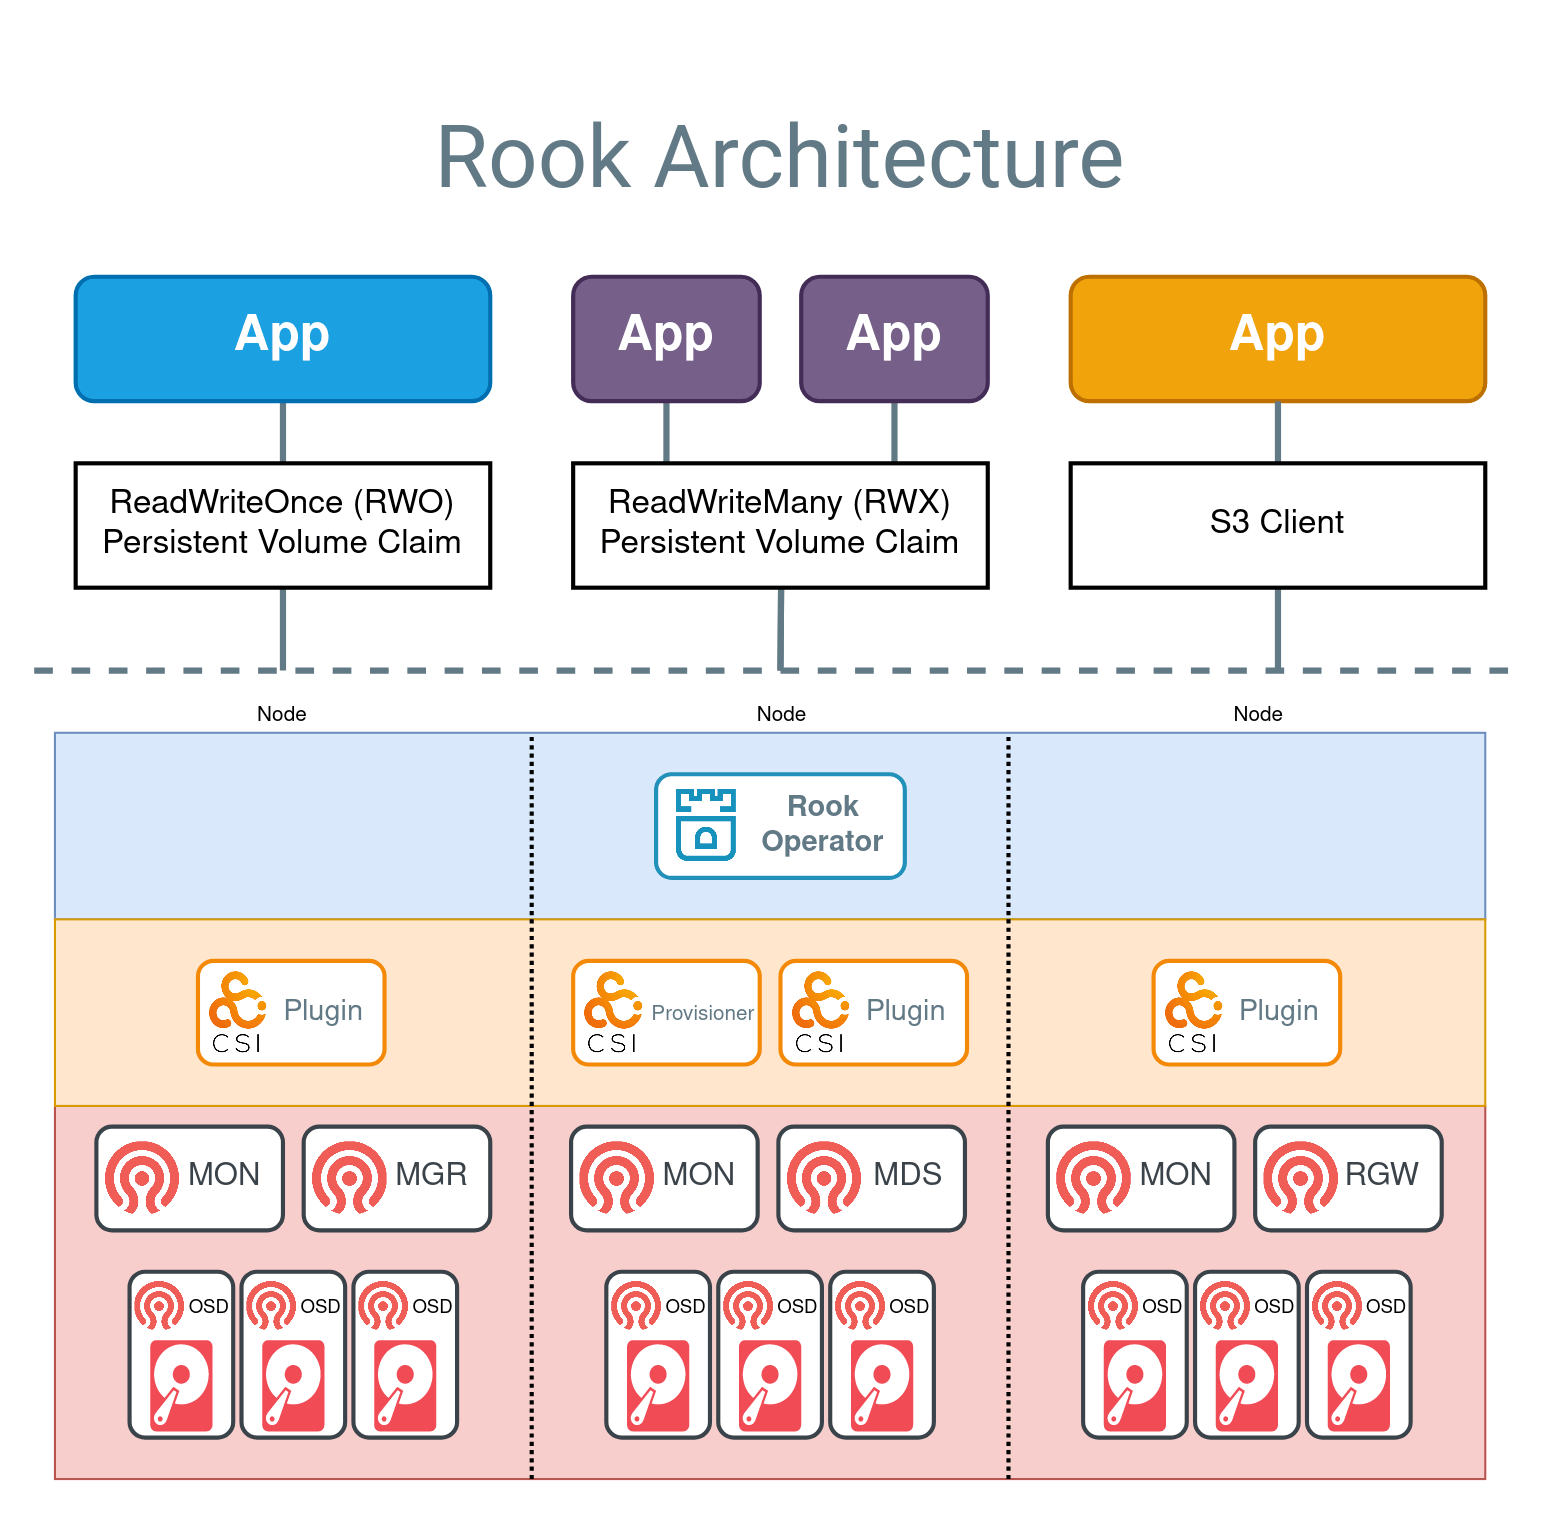
The Rook architecture is depicted by the screenshot below from the Rooks documentation page.

Prerequisites for Deploying Ceph on K8S using Rook
A running Kubernetes Cluster
You need to have a Kubernetes cluster up and running. In this guide, we are using a three worker-node Kubernetes cluster. See our guide below on how to deploy a three node Kubernetes cluster on Ubuntu;
Setup Kubernetes Cluster on Ubuntu 22.04/20.04
These are the details of my K8s cluster;
| Node | Hostname | IP Address | vCPUs | RAM (GB) | Storage Resource | OS |
| Master | master | 192.168.122.10 | 2 | 8 | OS: /dev/vda | Ubuntu 22.04 |
| Worker 1 | worker01 | 192.168.122.11 | 2 | 8 | OS: /dev/vda, OSD: raw /dev/vdb, 100G | Ubuntu 22.04 |
| Worker 2 | worker02 | 192.168.122.12 | 2 | 8 | OS: /dev/vda, OSD: raw /dev/vdb, 100G | Ubuntu 22.04 |
| Worker 3 | worker03 | 192.168.122.13 | 2 | 8 | OS: /dev/vda, OSD: raw /dev/vdb, 100G | Ubuntu 22.04 |
Cluster nodes;
kubectl get nodesNAME STATUS ROLES AGE VERSION
master Ready control-plane 13m v1.28.2
worker01 Ready <none> 5m48s v1.28.2
worker02 Ready <none> 5m45s v1.28.2
worker03 Ready <none> 5m42s v1.28.2
Note that Kubernetes v1.22 or higher is supported. You can get the version using the kubectl version command and check the Server version.
Storage Resources:
At least one of these local storage types is required:
- Raw devices (no partitions or formatted filesystems)
- Raw partitions (no formatted filesystem)
- LVM Logical Volumes (no formatted filesystem)
- Persistent Volumes available from a storage class in
blockmode
We will be using raw devices with no partitions/filesystem in this guide.
We have attached raw block devices each of 100G to each of the worker nodes in the cluster;
lsblk | grep -v '^loop'NAME MAJ:MIN RM SIZE RO TYPE MOUNTPOINTS
vda 252:0 0 100G 0 disk
├─vda1 252:1 0 1M 0 part
├─vda2 252:2 0 2G 0 part /boot
└─vda3 252:3 0 98G 0 part
└─ubuntu--vg-ubuntu--lv 253:0 0 98G 0 lvm /var/lib/kubelet/pods/d447336a-f345-4629-877f-003053e48c1c/volume-subpaths/tigera-ca-bundle/calico-node/1
/var/lib/kubelet/pods/8f82a481-64f1-4833-ad88-addc33181c39/volume-subpaths/tigera-ca-bundle/calico-typha/1
/
vdb 252:16 0 100G 0 disk
LVM Package
Ceph OSDs have a dependency on LVM in the following scenarios:
- OSDs are created on raw devices or partitions
- If encryption is enabled (
encryptedDevice: truein the cluster CR) - A
metadatadevice is specified
LVM is not required for OSDs in these scenarios:
- Creating OSDs on PVCs using the
storageClassDeviceSets
In this guide, since we are using raw block devices for OSDs, then we need to install the LVM package.
Since we are using Ubuntu in our environment, then you can install LVM package as follows;
sudo apt install lvm2For any other Linux distro, consult their documentation on how to install the LVM package.
Deploy the Rook Operator
Clone Current Rook Release Github Repository
Once you have all the prereqs in place, proceed to deploy Rook operator on the cluster node with full access to the kubeconfig.
So what is kubeconfig? kubeconfig is a an abbreviation for Kubernetes configuration file and is:
- A YAML file containing the configuration details required to connect to a Kubernetes cluster.
- Stores information like:
- Cluster server addresses.
- User credentials (certificate or token).
- Current context (the specific cluster and namespace you want to interact with).
- Used by various tools like
kubectl, the Kubernetes command-line tool, to interact with the cluster. - By default, kubeconfig is stored in the
.kube/configfile within the home directory of your user account. - You can also specify a custom location for the file using the
--kubeconfigflag in kubectl commands.
In our cluster, we have our kubeconfig on the control-plane/worker node.
To deploy Rook operator, you need to clone their Github repository. It is recommended that you clone the current Rook release Github repository. v1.13.0 is the current release as of this writing.
Install git package on your system. On Ubuntu, you can install git by executing the command below;
sudo apt install gitYou can then clone the current release branch of Rook as follows;
git clone --single-branch --branch release-1.13 https://github.com/rook/rook.gitThis clones Rook to rook directory in the current working directory.
ls -1 rook/ADOPTERS.md
build
cmd
CODE_OF_CONDUCT.md
CODE-OWNERS
CONTRIBUTING.md
DCO
deploy
design
Documentation
go.mod
go.sum
GOVERNANCE.md
images
INSTALL.md
LICENSE
Makefile
mkdocs.yml
OWNERS.md
PendingReleaseNotes.md
pkg
README.md
ROADMAP.md
SECURITY.md
tests
Deploy the Rook Operator
Next, navigate to the example manifests directory, rook/deploy/examples, and deploy the Rook operator (operator.yaml), the CRDs (Custom Resource Definitions, crds.yaml) and the common resources (common.yaml). In Kubernetes, a manifest is a YAML or JSON file that describes the desired state of a Kubernetes object within the cluster. These objects can include deployment, replica set, service… It includes information like:
- Kinds: The type of resource being created (e.g., Pod, Deployment, Service).
- Metadata: Names, labels, annotations, etc., for identification and configuration.
- Specifications: Detailed configuration of the resource, including containers, volumes, network settings, etc.
cd ~/rook/deploy/exampleskubectl create -f crds.yaml -f common.yaml -f operator.yamlSample command output;
customresourcedefinition.apiextensions.k8s.io/cephblockpoolradosnamespaces.ceph.rook.io created
customresourcedefinition.apiextensions.k8s.io/cephblockpools.ceph.rook.io created
customresourcedefinition.apiextensions.k8s.io/cephbucketnotifications.ceph.rook.io created
customresourcedefinition.apiextensions.k8s.io/cephbuckettopics.ceph.rook.io created
customresourcedefinition.apiextensions.k8s.io/cephclients.ceph.rook.io created
customresourcedefinition.apiextensions.k8s.io/cephclusters.ceph.rook.io created
customresourcedefinition.apiextensions.k8s.io/cephcosidrivers.ceph.rook.io created
customresourcedefinition.apiextensions.k8s.io/cephfilesystemmirrors.ceph.rook.io created
customresourcedefinition.apiextensions.k8s.io/cephfilesystems.ceph.rook.io created
customresourcedefinition.apiextensions.k8s.io/cephfilesystemsubvolumegroups.ceph.rook.io created
customresourcedefinition.apiextensions.k8s.io/cephnfses.ceph.rook.io created
customresourcedefinition.apiextensions.k8s.io/cephobjectrealms.ceph.rook.io created
customresourcedefinition.apiextensions.k8s.io/cephobjectstores.ceph.rook.io created
customresourcedefinition.apiextensions.k8s.io/cephobjectstoreusers.ceph.rook.io created
customresourcedefinition.apiextensions.k8s.io/cephobjectzonegroups.ceph.rook.io created
customresourcedefinition.apiextensions.k8s.io/cephobjectzones.ceph.rook.io created
customresourcedefinition.apiextensions.k8s.io/cephrbdmirrors.ceph.rook.io created
customresourcedefinition.apiextensions.k8s.io/objectbucketclaims.objectbucket.io created
customresourcedefinition.apiextensions.k8s.io/objectbuckets.objectbucket.io created
namespace/rook-ceph created
clusterrole.rbac.authorization.k8s.io/cephfs-csi-nodeplugin created
clusterrole.rbac.authorization.k8s.io/cephfs-external-provisioner-runner created
clusterrole.rbac.authorization.k8s.io/objectstorage-provisioner-role created
clusterrole.rbac.authorization.k8s.io/rbd-csi-nodeplugin created
clusterrole.rbac.authorization.k8s.io/rbd-external-provisioner-runner created
clusterrole.rbac.authorization.k8s.io/rook-ceph-cluster-mgmt created
clusterrole.rbac.authorization.k8s.io/rook-ceph-global created
clusterrole.rbac.authorization.k8s.io/rook-ceph-mgr-cluster created
clusterrole.rbac.authorization.k8s.io/rook-ceph-mgr-system created
clusterrole.rbac.authorization.k8s.io/rook-ceph-object-bucket created
clusterrole.rbac.authorization.k8s.io/rook-ceph-osd created
clusterrole.rbac.authorization.k8s.io/rook-ceph-system created
clusterrolebinding.rbac.authorization.k8s.io/cephfs-csi-nodeplugin-role created
clusterrolebinding.rbac.authorization.k8s.io/cephfs-csi-provisioner-role created
clusterrolebinding.rbac.authorization.k8s.io/objectstorage-provisioner-role-binding created
clusterrolebinding.rbac.authorization.k8s.io/rbd-csi-nodeplugin created
clusterrolebinding.rbac.authorization.k8s.io/rbd-csi-provisioner-role created
clusterrolebinding.rbac.authorization.k8s.io/rook-ceph-global created
clusterrolebinding.rbac.authorization.k8s.io/rook-ceph-mgr-cluster created
clusterrolebinding.rbac.authorization.k8s.io/rook-ceph-object-bucket created
clusterrolebinding.rbac.authorization.k8s.io/rook-ceph-osd created
clusterrolebinding.rbac.authorization.k8s.io/rook-ceph-system created
role.rbac.authorization.k8s.io/cephfs-external-provisioner-cfg created
role.rbac.authorization.k8s.io/rbd-csi-nodeplugin created
role.rbac.authorization.k8s.io/rbd-external-provisioner-cfg created
role.rbac.authorization.k8s.io/rook-ceph-cmd-reporter created
role.rbac.authorization.k8s.io/rook-ceph-mgr created
role.rbac.authorization.k8s.io/rook-ceph-osd created
role.rbac.authorization.k8s.io/rook-ceph-purge-osd created
role.rbac.authorization.k8s.io/rook-ceph-rgw created
role.rbac.authorization.k8s.io/rook-ceph-system created
rolebinding.rbac.authorization.k8s.io/cephfs-csi-provisioner-role-cfg created
rolebinding.rbac.authorization.k8s.io/rbd-csi-nodeplugin-role-cfg created
rolebinding.rbac.authorization.k8s.io/rbd-csi-provisioner-role-cfg created
rolebinding.rbac.authorization.k8s.io/rook-ceph-cluster-mgmt created
rolebinding.rbac.authorization.k8s.io/rook-ceph-cmd-reporter created
rolebinding.rbac.authorization.k8s.io/rook-ceph-mgr created
rolebinding.rbac.authorization.k8s.io/rook-ceph-mgr-system created
rolebinding.rbac.authorization.k8s.io/rook-ceph-osd created
rolebinding.rbac.authorization.k8s.io/rook-ceph-purge-osd created
rolebinding.rbac.authorization.k8s.io/rook-ceph-rgw created
rolebinding.rbac.authorization.k8s.io/rook-ceph-system created
serviceaccount/objectstorage-provisioner created
serviceaccount/rook-ceph-cmd-reporter created
serviceaccount/rook-ceph-mgr created
serviceaccount/rook-ceph-osd created
serviceaccount/rook-ceph-purge-osd created
serviceaccount/rook-ceph-rgw created
serviceaccount/rook-ceph-system created
serviceaccount/rook-csi-cephfs-plugin-sa created
serviceaccount/rook-csi-cephfs-provisioner-sa created
serviceaccount/rook-csi-rbd-plugin-sa created
serviceaccount/rook-csi-rbd-provisioner-sa created
configmap/rook-ceph-operator-config created
deployment.apps/rook-ceph-operator created
Rook uses a default namespace called rook-ceph;
kubectl get nsNAME STATUS AGE
calico-apiserver Active 3h9m
calico-system Active 3h9m
default Active 3h14m
kube-node-lease Active 3h14m
kube-public Active 3h14m
kube-system Active 3h14m
rook-ceph Active 7s
tigera-operator Active 3h10m
This therefore means that you have to specify the namespace for all subsequent kubectl commands related to Rook. If you want you can set the rook-ceph namespace as your preferred/default namespace so that you don’t have to specify the namespace when executing kubectl commands related to Rook by using the command, kubectl config set-context --current --namespace=<insert-rook-default-namespace-name-here>.
Deploying Ceph Storage Cluster in Kubernetes using Rook
Once the Rook Operator is deployed, you can now create the Ceph cluster.
Before you can proceed to deploy Ceph storage cluster, ensure that the rook-ceph-operator is in the Running state.
Note that Rook operator is deployed into rook-ceph namespace by default.
kubectl get pod -n rook-cephSample output;
NAME                                  READY   STATUS    RESTARTS   AGE
rook-ceph-operator-598b5dd74c-42gh5   1/1     Running   0          90s
Rook supports different Ceph cluster settings for various environments. There are different manifests for various cluster environments that Rook ships with. These include;
- cluster.yaml: Cluster settings for a production cluster running on bare metal. Requires at least three worker nodes. Like in our setup.
- cluster-on-pvc.yaml: Cluster settings for a production cluster running in a dynamic cloud environment.
- cluster-test.yaml: Cluster settings for a test environment such as minikube.
Now that the Rook operator is running, run the command below to create the cluster.
kubectl create -f cluster.yamlOutput; cephcluster.ceph.rook.io/rook-ceph created.
The cluster will now take a few to initialize.
You can execute the command below to check the status of the cluster pods;
kubectl get pod -n rook-cephSample output;
NAME                                           READY   STATUS    RESTARTS   AGE
csi-cephfsplugin-6cdnk                         2/2     Running   0          11s
csi-cephfsplugin-8klf8                         2/2     Running   0          11s
csi-cephfsplugin-dkkdf                         2/2     Running   0          11s
csi-cephfsplugin-provisioner-fd76b9895-888tm   5/5     Running   0          11s
csi-cephfsplugin-provisioner-fd76b9895-gscgb   5/5     Running   0          11s
csi-rbdplugin-gqfcl                            2/2     Running   0          11s
csi-rbdplugin-lkqpm                            2/2     Running   0          11s
csi-rbdplugin-provisioner-75f66b455d-6xlgh     5/5     Running   0          11s
csi-rbdplugin-provisioner-75f66b455d-7w44t     5/5     Running   0          11s
csi-rbdplugin-tjk2r                            2/2     Running   0          11s
rook-ceph-mon-a-6b97dfd866-44r2k               1/2     Running   0          4s
rook-ceph-operator-598b5dd74c-42gh5            1/1     Running   0          2m6s
Note that the number of osd pods that will be created will depend on the number of nodes in the cluster and the number of devices configured. For the default cluster.yaml above, one OSD will be created for each available device found on each node.
Once everything is initialized, the pod status may look like as shown in the output below;
NAME                                                 READY   STATUS      RESTARTS   AGE
csi-cephfsplugin-6cdnk                               2/2     Running     0          2m10s
csi-cephfsplugin-8klf8                               2/2     Running     0          2m10s
csi-cephfsplugin-dkkdf                               2/2     Running     0          2m10s
csi-cephfsplugin-provisioner-fd76b9895-888tm         5/5     Running     0          2m10s
csi-cephfsplugin-provisioner-fd76b9895-gscgb         5/5     Running     0          2m10s
csi-rbdplugin-gqfcl                                  2/2     Running     0          2m10s
csi-rbdplugin-lkqpm                                  2/2     Running     0          2m10s
csi-rbdplugin-provisioner-75f66b455d-6xlgh           5/5     Running     0          2m10s
csi-rbdplugin-provisioner-75f66b455d-7w44t           5/5     Running     0          2m10s
csi-rbdplugin-tjk2r                                  2/2     Running     0          2m10s
rook-ceph-crashcollector-worker01-9585d87f9-96phf    1/1     Running     0          60s
rook-ceph-crashcollector-worker02-7549954c4b-d5jch   1/1     Running     0          49s
rook-ceph-crashcollector-worker03-675cdbd7f7-pjv7n   1/1     Running     0          47s
rook-ceph-exporter-worker01-6c9cf475fc-jxddz         1/1     Running     0          60s
rook-ceph-exporter-worker02-6b57f48d4-qsvsr          1/1     Running     0          46s
rook-ceph-exporter-worker03-75fb9cc47f-sht56         1/1     Running     0          45s
rook-ceph-mgr-a-65f4bb6685-mh4xr                     3/3     Running     0          80s
rook-ceph-mgr-b-6648b7fb6-dqtdv                      3/3     Running     0          79s
rook-ceph-mon-a-6b97dfd866-44r2k                     2/2     Running     0          2m3s
rook-ceph-mon-b-785dcc4874-wkzm4                     2/2     Running     0          99s
rook-ceph-mon-c-586576df47-9ctwf                     2/2     Running     0          90s
rook-ceph-operator-598b5dd74c-42gh5                  1/1     Running     0          4m5s
rook-ceph-osd-0-55f6c88b9c-l8f2w                     2/2     Running     0          50s
rook-ceph-osd-1-64c6c74db4-zjfn9                     2/2     Running     0          49s
rook-ceph-osd-2-8455dcfb9f-ghrbc                     2/2     Running     0          47s
rook-ceph-osd-prepare-worker01-426s7                 0/1     Completed   0          21s
rook-ceph-osd-prepare-worker02-trvpb                 0/1     Completed   0          18s
rook-ceph-osd-prepare-worker03-b7n6b                 0/1     Completed   0          15s
Check Ceph Cluster Status
To check the Ceph cluster status, you can use Rook toolbox. The Rook toolbox is a container with common tools used for rook debugging and testing and can be run in two modes;
- Interactive mode: Start a toolbox pod where you can connect and execute Ceph commands from a shell
- One-time job mode: Run a script with Ceph commands and collect the results from the job log
We will use the interactive mode in this example guide. Thus, create a toolbox pod;
kubectl create -f toolbox.yamlYou can check the current status of the toolbox deployment;
kubectl -n rook-ceph rollout status deploy/rook-ceph-toolsSample output;
deployment "rook-ceph-tools" successfully rolled outAlso;
kubectl get pod -n rook-ceph | grep toolSample output;
rook-ceph-tools-564c8446db-xh6qp 1/1 Running 0 71sAfter that, connect to the rook-ceph-tools pod and check Ceph cluster status;
kubectl -n rook-ceph exec -it deploy/rook-ceph-tools -- ceph -sOr simply just use the name of the tools pod;
kubectl -n rook-ceph exec -it rook-ceph-tools-564c8446db-xh6qp -- ceph -sSample output;
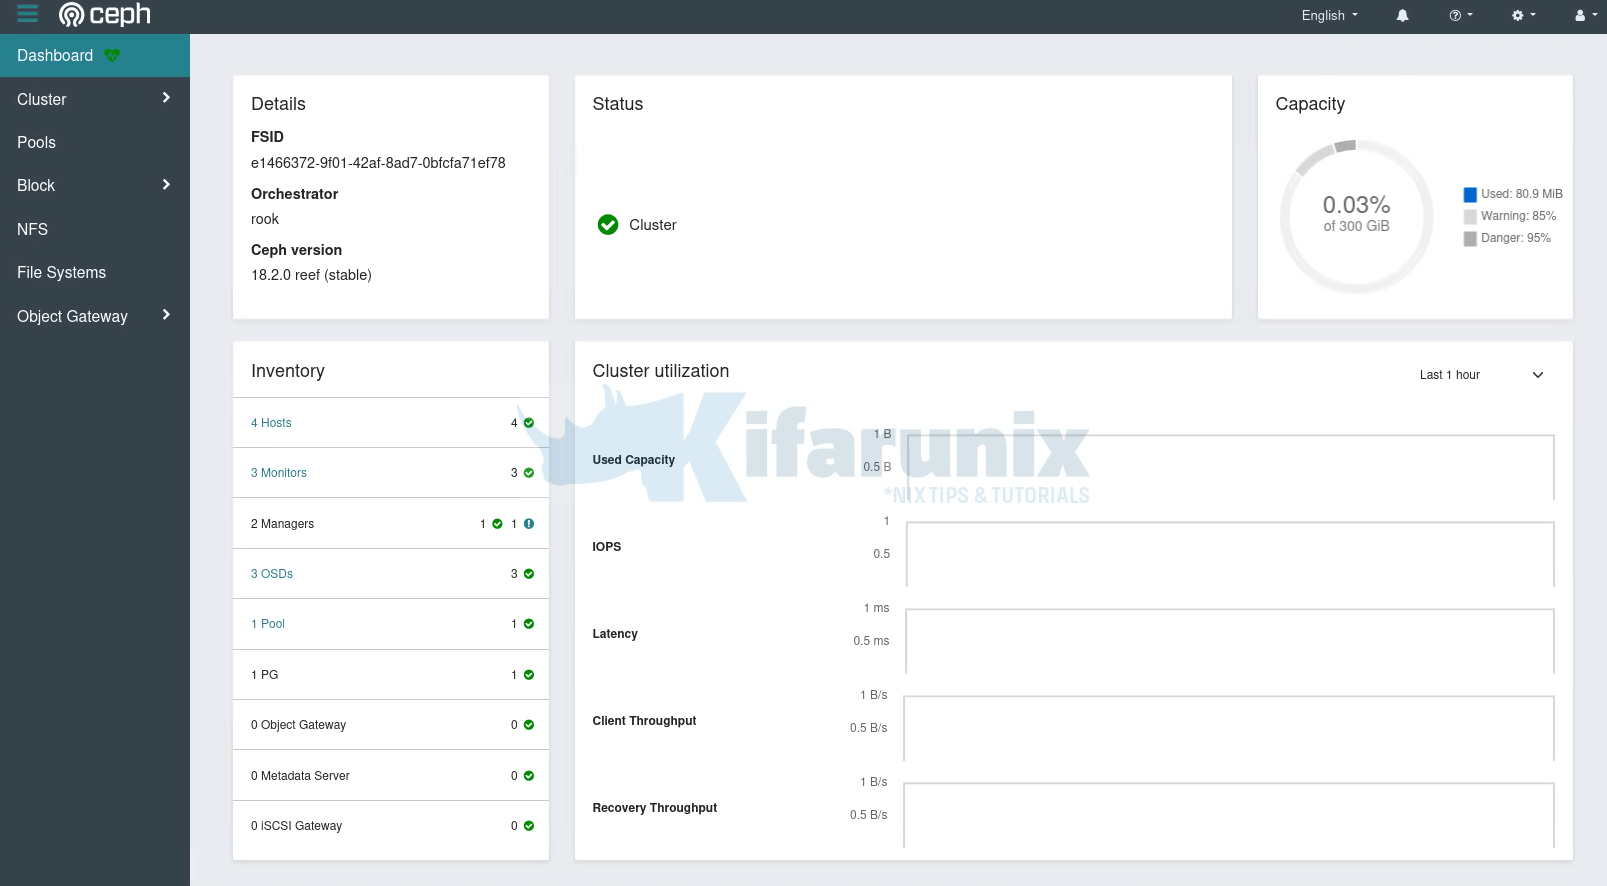
  cluster:
    id:     e1466372-9f01-42af-8ad7-0bfcfa71ef78
    health: HEALTH_OK

  services:
    mon: 3 daemons, quorum a,b,c (age 21m)
    mgr: a(active, since 20m), standbys: b
    osd: 3 osds: 3 up (since 20m), 3 in (since 21m)

  data:
    pools:   1 pools, 1 pgs
    objects: 2 objects, 449 KiB
    usage:   80 MiB used, 300 GiB / 300 GiB avail
    pgs:     1 active+clean
Or you can login to the pod and execute the commands if you want;
kubectl -n rook-ceph exec -it deploy/rook-ceph-tools -- bashYou can execute any Ceph commands in there.
If you want to remove the toolbox deployment from the rook-ceph namespace;
kubectl -n rook-ceph delete deploy/rook-ceph-toolsEnable Rook Ceph Orchestrator Module
The Rook Orchestrator module provides an integration between Ceph’s Orchestrator framework and Rook. It runs in the ceph-mgr daemon and implements the Ceph orchestration API by making changes to the Ceph storage cluster in Kubernetes that describe desired cluster state. A Rook cluster’s ceph-mgr daemon is running as a Kubernetes pod, and hence, the rook module can connect to the Kubernetes API without any explicit configuration.
While the orchestrator Ceph module is enabled by default, the rook Ceph module is disabled by default.
You need the Rook toolbox to enable Rook ceph orchestrator module. We have already enabled the Rook toolbox above.
Thus, either login directly to Rook toolbox tool (kubectl -n rook-ceph exec -it deploy/rook-ceph-tools -- bash) and execute the Ceph commands to enable the rook orchestrator module or simply execute the ceph commands without logging into the toolbox;
kubectl -n rook-ceph exec deploy/rook-ceph-tools -- ceph mgr module enable rookkubectl -n rook-ceph exec deploy/rook-ceph-tools -- ceph orch set backend rookCheck the Ceph Orchestrator status;
kubectl -n rook-ceph exec deploy/rook-ceph-tools -- ceph orch statusSample output;
Backend: rook
Available: Yes
Rook Ceph Storage Cluster Kubernetes Services
Ceph storage cluster Kubernetes services are also created;
kubectl get svc -n rook-cephNAME TYPE CLUSTER-IP EXTERNAL-IP PORT(S) AGE
rook-ceph-exporter ClusterIP 10.99.247.141 9926/TCP 34h
rook-ceph-mgr ClusterIP 10.96.140.21 9283/TCP 34h
rook-ceph-mgr-dashboard ClusterIP 10.103.155.135 8443/TCP 34h
rook-ceph-mon-a ClusterIP 10.110.254.175 6789/TCP,3300/TCP 34h
rook-ceph-mon-b ClusterIP 10.110.73.98 6789/TCP,3300/TCP 34h
rook-ceph-mon-c ClusterIP 10.98.191.150 6789/TCP,3300/TCP 34h
All these services are exposed within the Kubernetes cluster and are only accessible within the cluster via their Cluster IPs and ports.
To see more details about each service, you can describe it. For example;
kubectl describe svc <service-name> -n <namespace>Accessing Rook Kubernetes Ceph Storage Cluster Dashboard
As you can see above, we have a Ceph manager dashboard service, but is only accessible internally within the K8s cluster via the IP, 10.103.155.135, and port 8443 (https). To confirm this, get the description of the service.
kubectl describe svc rook-ceph-mgr-dashboard -n rook-cephName: rook-ceph-mgr-dashboard
Namespace: rook-ceph
Labels: app=rook-ceph-mgr
rook_cluster=rook-ceph
Annotations: <none>
Selector: app=rook-ceph-mgr,mgr_role=active,rook_cluster=rook-ceph
Type: ClusterIP
IP Family Policy: SingleStack
IP Families: IPv4
IP: 10.103.155.135
IPs: 10.103.155.135
Port: https-dashboard 8443/TCP
TargetPort: 8443/TCP
Endpoints: 10.100.30.75:8443
Session Affinity: None
Events: <none>
As you can see, this service is of type ClusterIP. This, as already mentioned, this exposes the service on a cluster-internal IP. Choosing this value makes the Service only reachable from within the cluster.
How can we externally access Rook Kubernetes Ceph Cluster dashboard?
There are several ways you can use to expose a service externally. One of them is to set the service type to NodePort. This exposes the service on each Node’s IP at a static port. You can let the port be defined automatically or manually set it yourself, in the service manifest file.
By default, Rook ships with a service manifest file that you can use to expose Ceph cluster externally via the cluster Node’s IP. The file is named as dashboard-external-https.yaml under ~/rook/deploy/examples.
cat ~/rook/deploy/examples/dashboard-external-https.yamlapiVersion: v1
kind: Service
metadata:
name: rook-ceph-mgr-dashboard-external-https
namespace: rook-ceph # namespace:cluster
labels:
app: rook-ceph-mgr
rook_cluster: rook-ceph # namespace:cluster
spec:
ports:
- name: dashboard
port: 8443
protocol: TCP
targetPort: 8443
selector:
app: rook-ceph-mgr
mgr_role: active
rook_cluster: rook-ceph # namespace:cluster
sessionAffinity: None
type: NodePort
So, to access the Ceph dashboard externally, create the external dashboard service.
cd ~/rook/deploy/exampleskubectl create -f dashboard-external-https.yamlConfirm the services;
kubectl get svc -n rook-cephNAME TYPE CLUSTER-IP EXTERNAL-IP PORT(S) AGE
rook-ceph-exporter ClusterIP 10.99.247.141 <none> 9926/TCP 35h
rook-ceph-mgr ClusterIP 10.96.140.21 <none> 9283/TCP 35h
rook-ceph-mgr-dashboard ClusterIP 10.103.155.135 <none> 8443/TCP 35h
rook-ceph-mgr-dashboard-external-https NodePort 10.105.180.199 <none> 8443:31617/TCP 25s
rook-ceph-mon-a ClusterIP 10.110.254.175 <none> 6789/TCP,3300/TCP 35h
rook-ceph-mon-b ClusterIP 10.110.73.98 <none> 6789/TCP,3300/TCP 35h
rook-ceph-mon-c ClusterIP 10.98.191.150 <none> 6789/TCP,3300/TCP 35h
As you can see, the service, rook-ceph-mgr-dashboard-external-https, internal port, 8443/TCP is mapped to port 31617/TCP on the each of the cluster host.
Get Kubernetes cluster Nodes IPs using kubectl command;
kubectl get nodes -o wideNAME STATUS ROLES AGE VERSION INTERNAL-IP EXTERNAL-IP OS-IMAGE KERNEL-VERSION CONTAINER-RUNTIME
master Ready control-plane 38h v1.28.2 192.168.122.10 <none> Ubuntu 22.04.2 LTS 5.15.0-76-generic containerd://1.6.26
worker01 Ready <none> 38h v1.28.2 192.168.122.11 <none> Ubuntu 22.04.2 LTS 5.15.0-91-generic containerd://1.6.26
worker02 Ready <none> 38h v1.28.2 192.168.122.12 <none> Ubuntu 22.04.2 LTS 5.15.0-76-generic containerd://1.6.26
worker03 Ready <none> 38h v1.28.2 192.168.122.13 <none> Ubuntu 22.04.2 LTS 5.15.0-76-generic containerd://1.6.26
So, you can access dashboard on any node IP and port, 31617/TCP, https (Accept the ssl warning and proceed to dashboard).
https://192.168.122.10:31617
You can get the login credential for the admin user from the secrets called rook-ceph-dashboard-password;
kubectl -n rook-ceph get secret rook-ceph-dashboard-password -o jsonpath="{['data']['password']}" | base64 --decode && echoUse the resulting password to login to ceph as user admin.

You can enable Telemetry from the toolbox pod using the command below;
kubectl -n rook-ceph exec -it rook-ceph-tools-564c8446db-xh6qp -- ceph telemetry on --license sharing-1-0Create Ceph Storage Pools
The ceph storage cluster is now running, however, without any usable storage pools. Ceph supports three types of storage that can be exposed by Rook:
- Block Storage
- Represented by Ceph Block Device (RBD)
- Provides raw block devices for persistent storage in Kubernetes pods.
- Similar to traditional block storage like hard drives or SSDs.
- Used for applications requiring low-latency access to raw data, such as databases and file systems.
- Check the guide on how to provision Block storage, Provision Block Storage for Kubernetes on Rook Ceph Cluster
- Object Storage
- Represented by Ceph Object Storage Gateway (RADOS Gateway, RGW)
- Offers S3-compatible object storage for unstructured data like images, videos, and backups.
- Applications can access objects directly using the S3 API.
- Ideal for cloud-native applications and large-scale data management.
- Shared Filesystem Storage
- Represented by Ceph File System (CephFS)
- Provides POSIX-compliant file system accessible from Kubernetes pods.
- Similar to traditional file systems like GlusterFS or NFS.
- Check the guide Configuring Shared Filesystem for Kubernetes on Rook Ceph Storage
Rook ships with manifests for all these types of storage just in case you want to configure and use them.
The manifests of these storage types are provided under the directory, ~/rook/deploy/examples/csi/ for both RBD and CephFS, and under ~/rook/deploy/examples/object.yaml for Object Storage.
You can proceed to provision the storage via Ceph.
Check our guide below on how to provision block storage for Kubernetes on Rook ceph cluster.

