-
On any Window’s machine, download and install VMware Player, if you have not already done so.
Instructions:
- http://downloads.vmware.com/d/info/desktop_downloads/vmware_player/3_0

-
Locate CentOS Mirror Download
Instructions:
- http://wiki.centos.org/Download
- On the CentOS-6 Row, Click on i386.

-
Choose a CentOS Mirror
Instructions:
- Choose a Mirror
-
Download CentOS-6.6 ISO
-
Instructions:
- Click on CentOS-6.6-i386-bin-DVD1.iso
- Click the Save File radio button
- Click the OK button

-
-
Save CentOS-6.6 ISO
-
Instructions:
-
Navigate to wherever you want to save the CentOS-6.6 ISO.
- In my case, I am saving the ISO to my external USB E: Drive.
- E.g., E:\CentOS-6.6\
- Click the Save Button
-

-
| Section 2. Create a New Virtual Machine |
-
Open VMware Player on your windows machine.
-
Instructions:
- Click the Start Button
- Type “vmware player” in the search box
- Click on VMware Player

-
-
Create a New Virtual Machine. (See Below)
-
Instructions:
- Click on Home
- Click on Create a New Virtual Machine

-
-
Installation Media
-
Instructions:
- Select the radio button “I will install the operating system later”
- Click Next
-
Note(FYI):
- Normally, you would select “Install disc image file (iso)”, but unfortunately VMware Player will attempt to do an easy install.

-
-
Select a Guest Operating System
-
Instructions:
- Guest operating system: Linux
- Version: CentOS
- Select Next

-
-
Name the Virtual Machine
-
Instructions:
- Virtual machine name: CentOS-6.6
-
Location: E:\CentOS-6.6
- In my case, I saved it to my USB drive.
- Click the Next Button

-
-
Specify Disk Capacity.
-
Instructions:
- Make the disk size to 20 GB.
- Select the radio button name Store virtual disk as a single file.
- Select Next.

-
-
Customize the Hardware.
-
Instructions:
- Select the Customize Hardware Button.

-
-
Configure Memory
-
Instructions:
- Click on Memory.
- Up the memory to 1 GB
- Do NOT Click the Close Button, we still have more to configure.

-
-
Configure CD/DVD
-
Instructions:
- Click on CD/DVD.
- Select the radio button “Use ISO image file:”
- Click the Browse Button, and navigate to the CentOS-6.6-i386-bin-DVD1.iso and double click on it.
-
Note(FYI):
- Do NOT Click the Close Button, we still have more to configure.

-
-
Configure the Network Adapter
-
Instructions:
- Click on Network Adapter
- Selected the Bridged radio button.
- Now, you can click the Close button.

-
-
Click Finish (See Below)
-
Instructions:
- Click the Finish Button

-
| Section 3. Install CentOS-6.6 to Hard Drive |
-
Start the CentOS-6.6 VM
-
Instructions:
- Click on the CentOS-6.6 VM
- Click on Play virtual machine

-
-
Install CentOS-6.6
-
Instructions:
- Scroll up to “Install or upgrade an existing system” and press <Enter>

-
-
Disc Found
-
Instructions:
- Right Arrow to the Skip Box and press <Enter>

-
-
Select Next
-
Instructions:
- Click the Next Button

-
-
Select Language
-
Instructions:
- Select English (English)
- Click Next

-
-
Select Keyboard
-
Instructions:
- Select English.
- Click Next

-
-
Select Storage Device
-
Instructions:
- Select Basic Storage Devices
- Select Next

-
-
Storage Device Warning
-
Instructions:
- Click the “Yes, discard any data” Button

-
-
Name the server
-
Instructions:
- Hostname: centos66
- Click the Next Button.

-
-
Select Time Zone
-
Instructions:
- Select the time zone of your choice.
- Select Next.

-
-
Select a root password.
-
Instructions:
- Root Password: <Supply A Strong Root Password>
- Confirm: <Re-Enter the previous Root Password>
- Click the Next Button
-
Note(FYI):
- At least 8 characters
- Alpha-Numeric
- Uppercase and Lowercase
- Symbols (!@#$%^&*, etc)

-
| Section 4. Creation Partitions |
-
Create Custom Layout.
-
Instructions:
- Select Create Custom Layout
- Click the Next Button

-
-
Create /boot (Part 1)
-
Instructions:
- Click on the Free Space under the SDA Hard Drive
-
Click the Create Button
- This will pop up a Create Storage window
- Click on the Radio Button “Standard Partition”
- Click on the Create Button

-
-
Create /boot (Part 2)
-
Instructions:
- Mount: /boot
-
File System Type: ext4 or ext2
- ext2 is sufficient if you do not think your /boot file system will change. For class purposes use ext4.
- Size: 500 (300 MB minimum)
- Addition Size Options: Select the Fixed size radio button
- Click OK
-
Note(FYI):
- The /boot partition holds the kernel and other data the system needs when it boots; it cannot be under the control of LVM.

-
-
Create / (Part 1)
-
Instructions:
- Click on the Free Space under the SDA Hard Drive
-
Click the Create Button
- This will pop up a Create Storage window
- Click on the Radio Button “Standard Partition”
- Click on the Create Button

-
-
Create / (Part 2)
-
Instructions:
- Mount: /
- File System Type: ext4
- Size: 4000 (Recommend: (3.0 GB – 5.0 GB)
- Additional Size Options: Select the Fixed size radio button
- Click OK
-
Note(FYI):
- Any file systems that are not created as a separate partition will become automatically part of the root(/) filesystem.

-
-
Create swap (Part 1)
-
Instructions:
- Click on the Free Space under the SDA Hard Drive
-
Click the Create Button
- This will pop up a Create Storage window
- Click on the Radio Button “Standard Partition”
- Click on the Create Button

-
-
Create swap (Part 2)
-
Instructions:
- File System Type: swap
-
Size: 3000 (Swap should double memory).
- Currently, 1 GB is allocated to memory. Only a maximum of 1.5 GB can be allocated to memory, since swap is 3000 MB or 3 GB
- Additional Size Options: Select the Fixed size radio button
- Click OK.
-
Note(FYI):
- Linux temporarily stores programs and data on a swap partition when it does not have enough RAM to hold all the information during processing. Also, swap is used when your hibernate the system.

-
-
Create a Physical Volume (Part 1)
-
Instructions:
- Click on the Free Space under the SDA Hard Drive
-
Click the Create Button
- This will pop up a Create Storage window
- Click on the Radio Button “LVM Physical Volume”
- Click on the Create Button

-
-
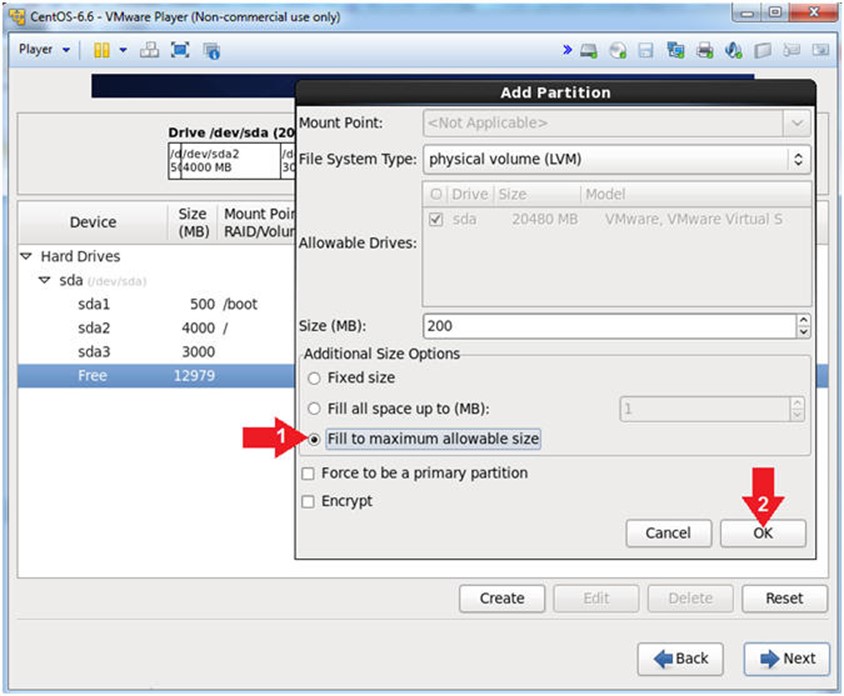
Create a Physical Volume (Part 2)
-
Instructions:
- Additional Size Options: “Fill to maximum allowable size” radio button
- Click OK
-
-
Create a Logical Volume Group
-
Instructions:
- Click on the sda5 physical volume
-
Click the Create Button
- This will pop up a Create Storage window
- Click on the Radio Button “LVM Volume Group”
- Click on the Create Button

-
-
Create /usr
-
Instructions:
- Click the Add Button
- Mount: /usr
- Size: 4500 (4 to 16 GB)
- Click OK
-
Note(FYI):
- The size of /usr depends on the number of software packages you install

-
-
Create /home
-
Instructions:
- Click the Add Button
- Mount: /home
- Size: 2000
- Click OK
-
Note(FYI):
- Size depends on the number of users on the machine and the type of work they do.

-
-
Create the /tmp filesystem.
-
Instructions:
- Click the Add Button
- Mount: /tmp
- Size: 1000 (Minimum 500 MB)
- Click OK
-
Note(FYI):
- Temporary files such as *.pid files reside here. For most Linux and Unix operating systems, data is not preserved between reboots.

-
-
Create the /var filesystem
-
Instructions:
- Click the Add Button
- Mount: /var
- Size: 4000 (Required minimum is 500 MB; however, Apache and MySQL is typically installed under /var).
- Click OK, in the Make Logical Volume
- Click OK, in the Make Logical Volume Group
-
Note(FYI):
-
/var is short for variable. Data in this partition changes frequently.
- /var/www/html – Where Apache Web Pages are stored.
- /var/log – Where the system log messages are stored.
- /var/mail – Where mail is stored
-

-
-
Review Your Work
-
Note(FYI):
- Both /boot and / are fixed file systems which cannot be changed.
- /home, /usr, /tmp, and /var are LVM file systems which can be increased or decreased in size.
-
Instructions:
- Click the Next Button

-
-
Format Warning
-
Instructions:
- Click the Format Button

-
-
Writing storage configuration to disk
-
Instructions:
- Click the Write changes to disk Button

-
-
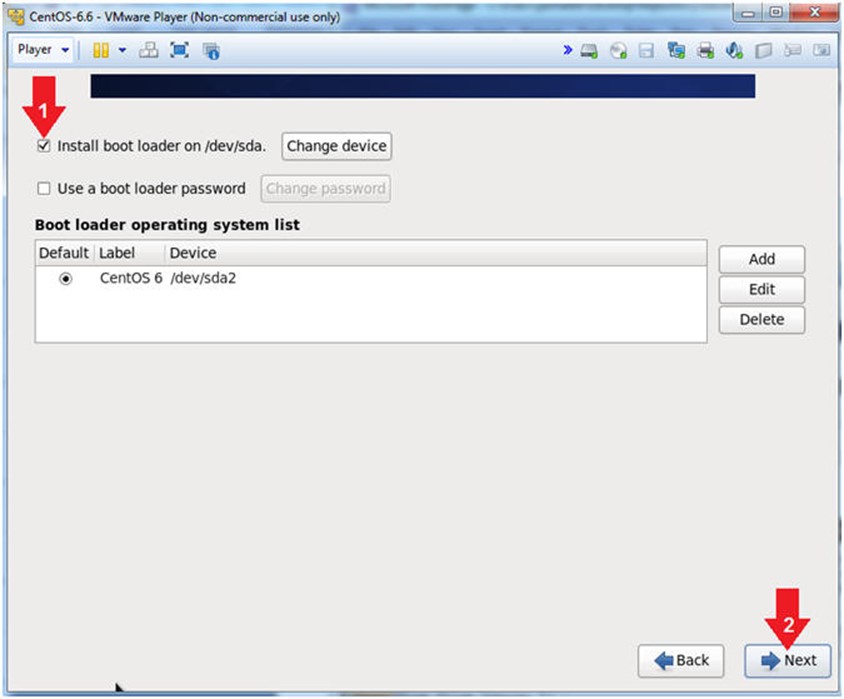
Install the boot loader
-
Instructions:
- Check the Install boot loader checkbox
- Click the Next Button
-
-
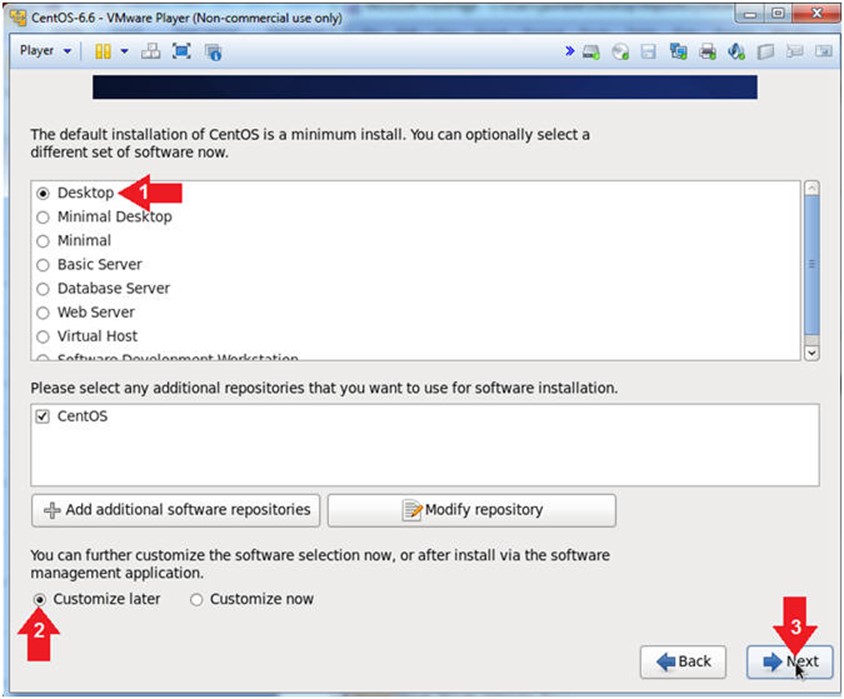
Install Software
-
Instructions:
- Click the Desktop radio button
- Click the Customize later radio button
- Click the Next Button
-
-
Install Software
-
Instructions:
- Click the Desktop radio button

-
-
Reboot System
-
Instructions:
- Click the Reboot button

-
| Section 5. Post CentOS Configuration |
-
Welcome
-
Instructions:
- Click the Forward Button

-
-
License Information
-
Instructions:
- Click “Yes, I agree to the License Agreement”
- Click the Forward Button

-
-
Create User
-
Instructions:
-
Username: student
- Do not change “student”, since this account is required for future labs.
-
Full Name: Security Student
- Replace Security Student with your actual full name.
- e.g., John Gray
- Password: <Supply A Strong Password>
- Confirm: <Re-Enter the previous Password>
- Click the Forward Button
-
-
Note(FYI):
- At least 8 characters
- Alpha-Numeric
- Uppercase and Lowercase
- Symbols (!@#$%^&*, etc)

-
-
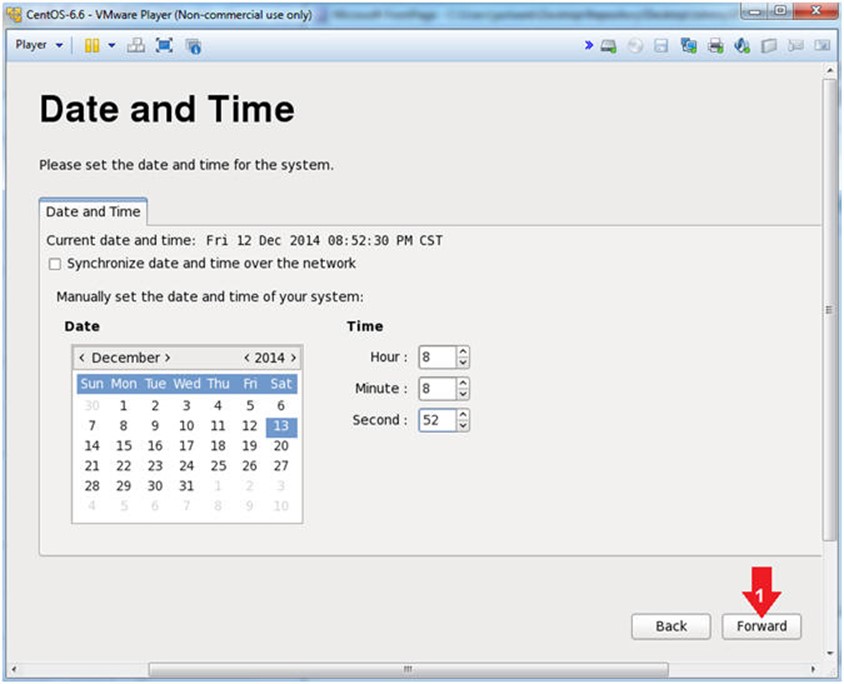
Date and Time
-
Instructions:
- Adjust the Date and Time and click the Forward Button
-
-
Kdump (Part 1)
-
Note(FYI):
- CentOS 6 requires 4 GB of RAM. Since, we only reserved 1 GB of memory for this virtual machine, you will receive and error message “Insufficient memory to auto-enable kdump”.
-
Instructions:
- Click the OK Button in the Insufficient memory warning window.

-
-
Kdump (Part 2)
-
Note(FYI):
- After clicking the Finish Button your machine will immediately reboot
-
Instructions:
- Click the Finish Button

-
| Section 6. Install VMware Tools |
-
Login to CentOS
-
Note(FYI):
- Until you click the user, in this case Security Student, the Password field will not be displayed.
-
Instructions:
-
Click on Security Student
- This will display the password text box.
- Supply its’ password
- Click the Log In Button
-

-
-
Launch Install VMware Tools…
-
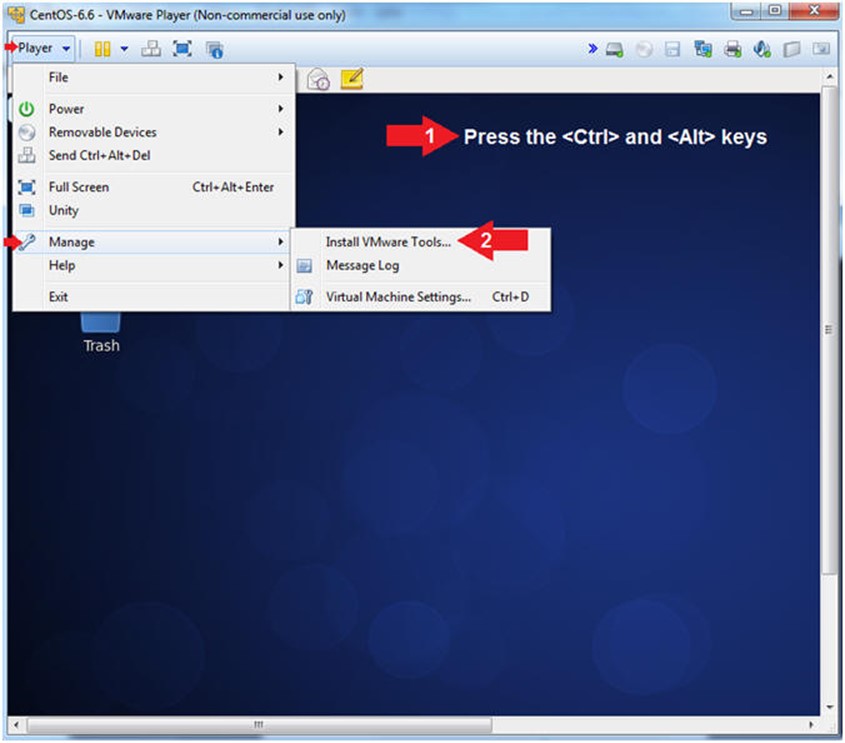
Instructions:
-
Press the <Ctrl> and <Alt> keys
- The will bring mouse focus back to your host machine
- Click on Player –> Manage –> Install VMware Tools…
-
-
-
Open a Terminal
-
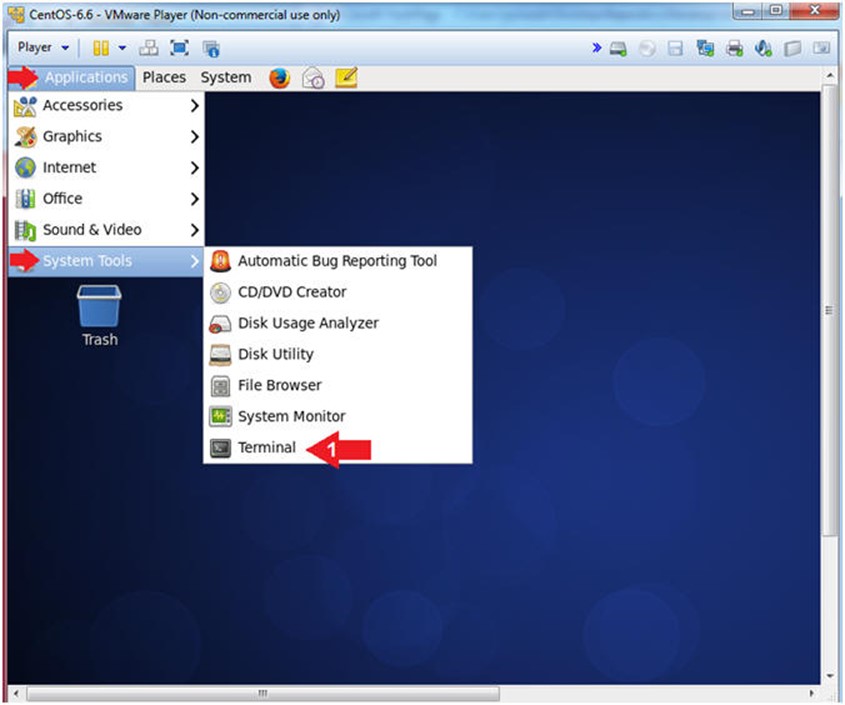
Instructions:
- Applications –> System Tools –> Terminal

-
-
View VMware Tools Mount Location
-
Instructions:
- su – root
- Password: <Supply the root password>
- df -k
-
Note(FYI):
- su – root, means switch user to root.
- df -k, means to view file system disk space in the block size.
- Notice, VMware Tools was mounted to /dev/sr0 and is accessible in the directory /media/VMware Tools.

-
-
Uncompress VMWare Tools Bundle
-
Instructions:
- cd /media/VMware\ Tools/
- ls -lrta
- cp VMwareTools*gz /var/tmp/
- cd /var/tmp
- tar zoxvf VMwareTools*gz
-
Note(FYI):
- cd, means to change directory.
-
ls, means to list the directory contents.
- -lrta, (l) long listing, (r) in reverse order by (t) time, and show (a) invisible files.
- cp, means to copy the VMWare Tools bundle to the /var/tmp directory.
- cd, means to change directory to the /var/tmp directory
-
tar, means to uncompress or compress files or directories. In our case we are going to uncompress the VMware Tools Bundle.
- zoxvf, (x) means to extract and (z) unzip the (f) file in (v) verbose mode while keeping the same (o) ownerships.

-
-
Install VMware tools
-
Instructions:
- cd vmware-tools-distrib/
- perl vmware-install.pl default

-
-
Review Installation Output
-
Note(FYI):
- Scroll towards the bottom of the output for a completion message.
- In order for “all” of the vmware tool features to be invoked we will later reboot the machine in a later step.

-
| Section 7. Post Virtual Machine Settings Configuration |
-
Open Virtual Machine Settings
-
Instructions:
- Press the <Ctrl> and <Alt> keys to bring mouse focus back to the host machine.
- Player –> Manage –> Virtual Machine Settings…

-
-
Change CD/DVD Settings
-
Note(FYI):
- Below we want the Virtual Machine to boot from its’ hard drive instead of the CentOS ISO.
-
Instructions:
- Click on CD/DVD (IDE)
- Click on the radio button “Use physical drive:”
- Select “Auto detect”
- Click the OK Button

-
| Section 8. Reboot Machine |
-
Open a Terminal
-
Instructions:
- Applications –> System Tools –> Terminal
-
-
Reboot Server
-
Instructions:
- su – root
- Password: <Supply the root password>
- reboot

-
| Section 9. Verify VMware Tools is working |
-
Login to CentOS
-
Note(FYI):
- Until you click the user, in this case Security Student, the Password field will not be displayed.
-
Instructions:
-
Click on Security Student
- This will display the password text box.
- Supply its’ password
- Click the Log In Button
-

-
-
Resize Window
-
Instructions:
- Try to resize the Window, by dragging the bottom right corner of the window. If scroll bar disappear, then you have verified VMware Tools is now installed.
-
Note(FYI):
- If scroll bar disappear, then you have verified VMware Tools is now installed.

-
| Section 10: Install GCC |
-
Open a Terminal
-
Instructions:
- Applications –> System Tools –> Terminal

-
-
Switch User to Root
-
Instructions:
- su – root
- Provide the Root Password

-
-
Finding the GCC Compiler
-
Instructions:
- yum list | grep gcc
-
Note(FYI):
- Yum, is the package manager for Fedora, CentOS and RedHat.
- yum list, displays all the repository packages to the screen
- | grep gcc, filters the output to only display lines that contains the string gcc.

-
-
Install GCC
-
Instructions:
- yum install gcc.i686
- Is this ok [y/N]: y
- You will see this question “Is this ok [y/N]:” four more times, please answer “y” to all questions.

-
| Section 11: Proof of Lab |
-
Start Up a Terminal Window
-
Instructions:
- Applications –> Terminal

-
-
Proof of Lab
-
Instructions:
-
tail -1 /etc/passwd
- Where “1” is a one.
- tune2fs -l /dev/sda1 | grep “Filesystem created:”
- date
-
echo “Your Name”
- Put in your actual name in place of “Your Name”
- e.g., echo “John Gray”
-
-
Proof of Lab Instructions
- Press the <Ctrl> and <Alt> key at the same time.
- Press the <PrtScn> key.
- Paste into a word document
- Upload to Moodle

-
